

So this post is out of pure frustration. For anyone that knows or heard of Wireguard VPN, its meant to be really quick and simple and it is once its all up and working, but the guilds, forums, blogs out there are all using mishmash of commands and configs and it really just threw off and for an on off period of a couple of days before I finally got it working in my workflow.
So why?
So I have some GitHub workflows that I want to be able to deploy things on-perm and to push artifacts to on-perm hosted artifacties like chartmuseum. But I don't want to just. open the on-perm dc to the world and allow anyone access, so I want a really simple and fast solution to VPN into my DC.
GitHub offers a half-assed guild on how to do this, but again like all the other guilds out there, it's pretty shit.
Overview
We going to have one server in the DC that acts as the VPN server, it will act as the gateway between my Prod and Staging environments, it has a public IP address and is connected to both environments networks. It is firewalled and only allows UDP port 56929 on the public interface. I could make this firewall better by whitelisting the Public IPs of GitHub but I am happy with this for now.
Then in GitHub workflows, I will have a task that installs wireguard, configures it and connects back to the main server in the DC.
On Perm VPN Server Setup
I am using Ansible to deploy everything on my servers, so first I need to generate some keys to add to Ansible.
on a local machine somewhere install wireguard, I have a Ubuntu box and I just run the apt install command:
apt update
apt install wireguard
Next, we want to generate some keys, these keys are what are used to encrypt all the traffic between the hosts.
So for the Private key we want to run:
wg genkey > privatekey
wg genkey > privatekey_peer
Public Key run:
wg pubkey < privatekey > publickey
wg pubkey < privatekey_peer > publickey_peer
You'll see I run each command twice, the second time with _peer, one set of keys will be used in GitHub workflow and one on the VPN server
Now that you have these, copy the contents into an encrypted vars file in your Ansible setup:

For those of you that have not used encrypted vars file, once encrypted this is what the file looks like:

Next, I create a really basic role in my Ansible folder and call it wireguard it will have one main task file and a couple of template files.
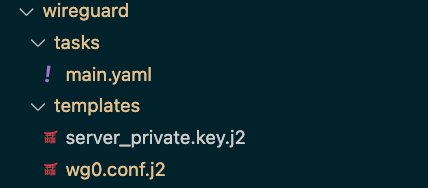
The tasks file will have the following content:
---
- name: Install wireguard.
  apt:
    name:
      - wireguard
    state: present

- name: creating wireguard folder
  file:
    path: /etc/wireguard
    state: directory
    owner: root
    group: root
    mode: 0600

- name: Deploy keys config
  template:
    src: templates/server_private.key.j2
    dest: /etc/wireguard/private.key
    mode: 0600
    owner: root
    group: root

- name: Deploy config
  template:
    src: templates/wg0.conf.j2
    dest: /etc/wireguard/wg0.conf
    mode: 0600
    owner: root
    group: root

- name: Enable IPv4 forwarding
  sysctl:
    name: net.ipv4.ip_forward
    value: 1
    state: present
    reload: True

- name: Enable wireguard
  shell: |
    systemctl enable wg-quick@wg0.service
    systemctl start wg-quick@wg0.service
become: trueIt's really simple and yes it could be better with some tests and checks, but for this I am happy. First, all it does is install a wireguard, next we create the wireguard folder and set the file permissions to only allow root access. Then we deploy our config and keys to the server, we then make sure ipv4 forwarding is turned on and lastly enable the service.
The private key template file is simple:
{{ server_private_key }}Then the main piece of the puzzle is the config file:
[Interface]
Address = 10.41.0.1/24
ListenPort = 56929
PrivateKey = {{ server_private_key }}

PreUp = sysctl -w net.ipv4.ip_forward=1

PostUp = iptables -A FORWARD -i wg0 -j ACCEPT; iptables -t nat -A POSTROUTING -o ens34 -j MASQUERADE; iptables -t nat -A POSTROUTING -o ens35 -j MASQUERADE; iptables -t nat -A POSTROUTING -o ens36 -j MASQUERADE

PostDown = iptables -D FORWARD -i wg0 -j ACCEPT; iptables -t nat -D POSTROUTING -o ens34 -j MASQUERADE; iptables -t nat -D POSTROUTING -o ens35 -j MASQUERADE; iptables -t nat -D POSTROUTING -o ens36 -j MASQUERADE


[Peer]
PublicKey = {{ peer_public_key }}
AllowedIPs = <Local Subnets>Let's break this file down, first under the [Interface] we set the address of the server-side VPN tunnel and this is where you can get unstuck very quickly with all the guides and blogs out there.
Depending on how you try to bring up the VPN tunnel it will fail with Address=. There are two main commands that you learn with Wireguard wg and wg-quick. If you use wg this is the low-level command for wireguard and doesn't know about address, dns or pre-up. Whereas if using wg-quick it knows about these config options and is a tool that also helps remove the need to run any ip add commands and I would say only use wg-quick!
Back to the config, after setting the Addesss, we list the ListenPort and we put the contents of the private key in as well, another important one, is do NOT put the file path to the key.
Next are some networking commands to allow traffic to flow through our VPN and into our local network. PreUp commands it runs before bringing the VPN up and this is safety to ensure that IP forwarding is on. Next PostUp and PostDwon are as they sound, commands to run once the VPN is up or down. These again are the commands to let traffic flow to our local network.
Next, [Peer] this is nice and simple, you can have as many [Peer] sections as you want for different clients to connect, as we just doing this for my workflows I will add a [Peer] for each workflow so as not to cut each other off. Remember that for each [Peer] you need to generate a new key pair! In this example, I just have the one which lists the public key and the IP address that is allowed to connect, in this case, I have set it to any IPv4 address.
Lastly, the step is to set up a playbook in my Ansible, and again this is simple, in my setup it sets the networking, and all the base configuration I have on all my servers sets the hostname and in this case runs the wireguard role as well:
- name: PlayBook for Git VPN Server
  hosts: gitvpn
  become: true
  gather_facts: true

  roles:
    - oefenweb.hostname.mod
    - base

    - name: mrlesmithjr.netplan
      vars:
        netplan_enabled: true
        netplan_configuration:
          network:
            version: 2
            ethernets:
              ens34:
                addresses:
                  - "{{ gitvpn_wan_ip }}/32"
                dhcp4: false
                nameservers:
                  addresses: "{{ internal_dns_servers }}"
                routes:
                  - to: 0.0.0.0/0
                    via: "{{ public_gw }}"
                    on-link: true
              ens35:
                addresses:
                  - "{{ gitvpn_prod_internal_ip }}/24"
                dhcp4: false
              ens36:
                addresses:
                  - "{{ gitvpn_staging_internal_ip }}/24"
                dhcp4: false

    - name: wireguard
      vars:
        server_private_key: "{{ wireguard_server_private_key }}"
        peer_public_key: "{{ wireguard_peer_public_key }}"

- name: Include a DNS play
ansible.builtin.import_playbook: dns_update.ymlYou can see here this is where I pass in the keys that I stored in the encrypted vars file as well.
Now we deploy that and we can move on to the workflow in Git Hub.
GitHub Workflow
The workflow is pretty simple, I keep all the wireguard config in secret to reduce lines of code, so the first thing I do is create WG_CONFIG secret with the following content:
[Interface]
Address = 10.41.0.4/24
PrivateKey = <Replace with Private Key>
ListenPort = 51820


[Peer]
PublicKey = <Replace with server public key>
Endpoint = <Servers Public IP>:56929
AllowedIPs = <Replace with Local Subnets>
So big issue here, if you have followed the GitHub page on how to do this, the AllowedIPs are set to 0.0.0.0/0 this breaks everything as it then tries to send all traffic over the VPN and thus the VM stops talking to Githubs internal infra, you'll find you can't even stop the workflow, and that GitHub forces it to stop after 5 mins! So best just to set this to the subnet you want to access locally!
Now that you have that as a secret you can add steps to the workflow, below is just a simple test workflow:
name: VPN Test

on:
  workflow_dispatch:

env:
  config_file: ${{ secrets.WG_CONFIG_FILE }}


jobs:
  build:
    runs-on: ubuntu-latest

    steps:
      - name: wireguard setup
        shell: bash
        run: |
          sudo apt install wireguard
          echo "${{ env.config_file }}" > wg0.conf
          sudo chmod 600 wg0.conf
          echo "setting config"
          sudo wg-quick up ./wg0.conf
          ping 10.41.0.1 -c 50
          sleep 30m
This just installs and then starts the VPN. Note I do a ping here, this is because
WireGuard tries to be as silent as possible when not being used; it is not a chatty protocol. For the most part, it only transmits data when a peer wishes to send packets. When it's not being asked to send packets, it stops sending packets until it is asked again. In the majority of configurations, this works well.
Now you could add to your configuration PersistentKeepalive = 25 which will keep the VPN alive every 25 seconds allowing the server side to send data to the workflow, but that's not what we want or are doing so I leave it out.
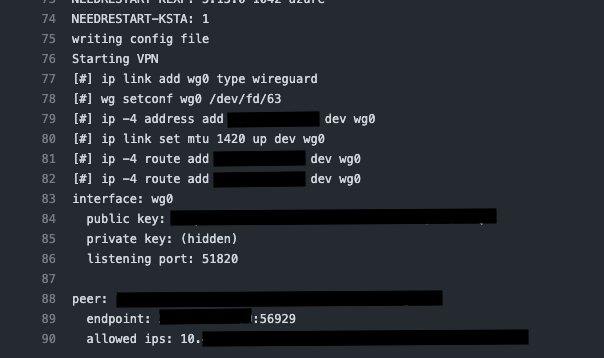
If you run the workflow you should now expect to see the following:
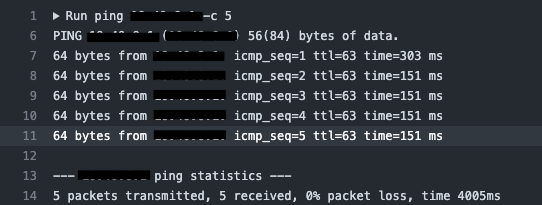
Then If you go to your local server and run wg you should see there has been a handshake with your peer and that data is flowing:

Now with all that you can build on having your workflow do whatever you need.
Notes
- DO NOT run
ip addcommands yourself, letwg-quickdo it for you. - DO NOT run
wgcommand, the one exception to the rule is unless you're checking the state of the VPN - DO NOT set
PeerAllowedIPsare set to0.0.0.0/0, set to your local subnets - To debug connection issues use the following commands:
echo "module wireguard +p" > /sys/kernel/debug/dynamic_debug/control
dmesg -ew